
If you’re a DIY enthusiast looking for some DIY guitar building tips, then this DIY Guitar Kit review is just for you! This DIY guitar kit will teach you how to build electric guitars. There’s no need to be intimidated by the process of making your own custom electric guitar because it’s actually really easy and can save you thousands of dollars in the long run. We’ll go over everything from what tools are needed, step-by-step instructions on how to put together an light electric guitar, and some cool features that make this DIY Electric Guitar Kit so great!
In my 30-plus years as Eric Clapton’s guitar tech, I handled a lot of great
guitars . . . I mean, A LOT. I often wonder where life would’ve taken me
were it not for the electric guitar and the profound impression it left on my
life. So many wonderful inventions have changed the way we play and listen
to music over the past 60 years, but a plugged-in electric guitar has got to
be one of the greatest! In some ways, they remind me of women—once you
have the right one in your arms, you’ll never want to let go. Having said
that, as with women, every guitar is unique. I suppose in modern parlance
the correct term would be the “perfect partner”!
I’ve been fortunate to work with some of the world’s greatest guitarists. I
always find it fascinating how very similar some are in their guitar tastes, and how very different
others are. When you look at what’s available, the choices are vast and amazing: different woods,
pickups, finishes, etc. And, of course, there are our favorite manufacturers whose wares we crave!
And like me, you probably have particular favorites that seem to feel, sound, and look just right.
During three decades, I’ve fixed them, played them, cared for them, bought them, and sold them.
But at the end of the day, every great guitar has one thing in common: someone put a lot of love
and soul into its creation!
Have you ever thought of pouring your own love and soul into a “one-of-a-kind” instrument?
With this book and some patience, you’ll be able to build a great guitar from a kit, even aging
it to get that vintage vibe if you wish. Will Kelly is a great musician, builder of great custom-made guitars, and one of my dearest friends. It’s fascinating to watch Will construct a guitar, and customizing it to his client’s exact specs. In this book, he takes you through every step of the process in his own inimitable style, making it clear, concise, and—most importantly—easy to understand.
I was lucky enough to spend some time at his Hard Knocks Guitars shop last year and watch
the man at work. Will told me he was anxious to learn some tricks from me—in reality, it was
the other way around! Will had just finished a stunning relic Strat in Sherwood metallic green for
my good friend Johnny Hiland. I can honestly say it was one of the best Strats that I’ve played . . .
and that’s saying something! The look and the feel were straight out of the ’60s, and the sound
was right on the money. That weekend Will told me about writing this book and asked me to get
involved. He could have asked any number of well-known musicians or guitar techs to write this
foreword, so I am especially honored that he chose me. All the good stuff is in this book, so get
that workbench area tidy and ready to build your own electric guitar—and may you both live
happily ever after! When your guitar is finished and you strum your handiwork, you’ll be amazed
at what you’ve accomplished with the expert guidance on these pages.
How to use this DIY Guitar Kit Complete Guide?
This blog post four guitar builds that comprises one sequential timeline. A basic degree
of expertise is imparted during the construction of the Strat-style guitar in Chapter 1. Those
skills are then fully utilized, while additional new techniques are acquired, during the course of
completing the relic’d Tele-style guitar in Chapter 2, and so on. In other words, the techniques
and procedures presented in each chapter provide a strong foundation for the introduction of
subsequent skill sets. It should be noted that once a technique has been imparted, the procedure
is not interjected in later chapters unless there are significant differences pertaining specifically to
the new chapter. It is hoped the reader will expand their skills organically by following the builds
in sequence. All of this said, however, the book can also work as a reference for the enthusiast
looking for instructions or advice on specific aspects of the guitar-building process.
The advent of CNC machining has resulted not only in affordable kit parts but also in
manufacturing tolerances that are nearly perfect. You should experience no problems in areas
such as component fit, hardware-mounting-hole locations, and the overall integrity of the
completed instrument. Fine-tuning the action, intonation, and playability of the guitar after
you’ve assembled it will determine the success of your instrument from a player’s standpoint.
Such considerations as the appearance of the finish are subjective. Professionals know that lacquer
paint takes years to cure properly—the new finish you sprayed on your guitar yesterday will still
be settling for years to come. Producing flawless, glass-like finishes takes patience and time.
One other bit of advice: Guitar repairmen are well-known for freely sharing information.
I believe this comes from the fact that a lot of repairs attempted at home ultimately end up in
their shops. Educating guitar owners in the basics of guitar upkeep helps preserve instruments
for the large community of guitar players out there. If you get stuck with a particular section or
procedure in this book, don’t be afraid to head down to your local music shop and talk with the
repairman. You should probably get to know him anyway. If he’s any good, he’ll set your build
project straight in no time and will be a great resource should you start investigating upgrades
and modifications down the road.
An instrument you construct yourself is something that will eventually be passed down to
future generations. The time, money, and effort you invest today will be owned, played, and
judged for years to come. So be patient and diligent, and take the time now to do the little things
right. The fine details do matter—especially when it comes to guitars.
Enjoy!
Sunburst Strat-style Bolt-Neck
There are so many versions of the venerable Strat-style guitar. Deciding to
build one yourself will quickly present a plethora of choices. Whether you
assemble your components independently from various sources or purchase
an “all in one” kit from a manufacturer, there are still some decisions to make
before laying down your hard-earned money.
Lower-priced guitar kits usually provide you with everything required
to assemble a working instrument. They include a hardwood body, neck,
inexpensive hardware, and electronic components, even guitar strings and a
connecting cable. These kits are a great way to try out the assembly and setup
process, and to find out if you’re up to the challenge. But, at the end of the
day, you’ll still have a budget guitar because of the lower-quality components
provided in the kit.
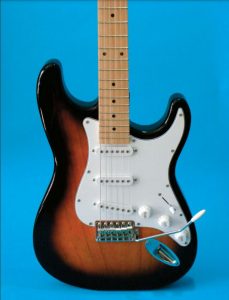
Holly, Hendrix, Clapton, Beck, Gilmour,
Knopfler, SRV . . . the list of legendary players
associated with Fender’s sleek, timeless
Stratocaster players seem endless. The body
style, sleek yet friendly, has a timeless quality
that endures. And there are so many versions
of the venerable Strat-style guitar that deciding
to build one yourself will quickly present a
a plethora of decisions.
Here are some of the important details to consider when it comes to a
kit’s components:
1. You want quality “tonewoods” for the body and neck construction.
For guitar bodies, the traditional tonewoods are mahogany, alder, ash, and
maple. Woods such as Pauwlonia and basswood are softer and less dense than
traditional tonewoods. Bodies made from these lower-cost woods are also
more likely to be built from multiple pieces of wood that have been glued
together into larger, body-sized blocks for carving, rather than from one solid
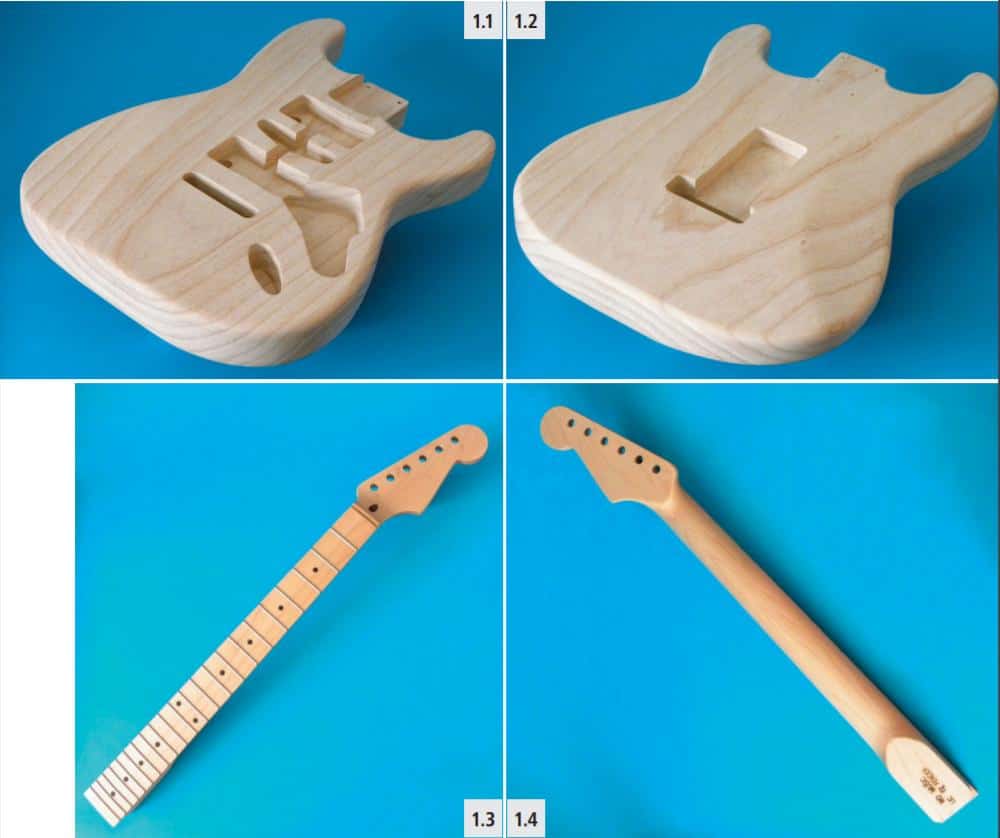
piece (photos 1.1 and 1.2)
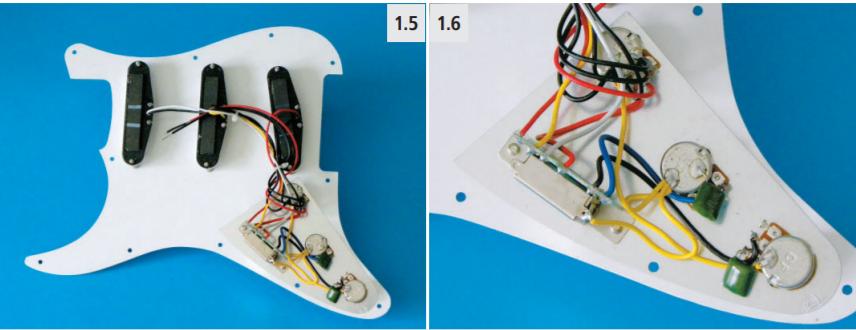
Photo 1.1 The front of our southern swamp
ash Strat-style body, showing the alternating
light and dark grain patterns that make this
type of wood so sought after. Not to mention
the wonderful tone! Southern swamp ash has
become rarer and harder to find over the past
20 years.
Photo 1.2 The dark and light grain patterns are
actually hard and soft areas of the swamp ash’s
surface that can wear at different rates over time
for a ridged feel. These hard and soft grain areas
are a special challenge to finish. A light hand
and delicate touch are required when it comes to
sanding them evenly and smoothly.
Photo 1.3 Constructed from maple, this is a
traditional Fender-style neck from the early days
of the electric guitar. Leo Fender’s idea was
to make the entire neck from just one piece of
wood, working it into shape with a minimum of
fuss. During the ’60s Fender switched over to
separate maple fingerboards on top of maple
necks. This particular neck was refinished in a
satin clear sealer coat, which is pretty standard
for most low-cost kits.
Photo 1.4 There’s no “skunk stripe” walnut
inlay on the rear of our neck because the
the fingerboard is a separate piece of maple and
the truss rod route is done from the front,
rather than the rear of the neck, which required
an inlay to cover the routed area. Some artists
and builders feel this “maple on maple”
construction provides the tightest, most
resonant neck. Brad Paisley’s one of them.
Photo 1.5 Rear view of our prewired,
Strat-style pickguard assembly. The pickups
and electronic components are already
soldered, ready for some final connections.
The quality of these components is fairly
impressive given the relatively low cost of the
kit. With a kit build, the pickups are usually the
first things upgraded.
Photo 1.6 The only wires left unattached are
the grounding wire from the tremolo assembly
and the two output wires coming from the
master volume control. These wires have to
pass-through holes between cavity spaces in
the body, so they must be connected during
final assembly
2. Necks are typically made from either mahogany or maple. Rosewood,
ebony, and maple are the principal tonewoods for fingerboards. Maple is
strong, tightly grained, and relatively stable, so it makes great neck stock.
Mahogany is slightly softer and more open-grained, but a wonderful tone
enhancer for set-neck-construction instruments (photos 1.3 and 1.4).
3. Electronic components will usually be below grade, subject to noisy
and intermittent operation, and have no durability. If you’re serious about
your instrument build, think about upgrading the electronic components
by purchasing aftermarket replacements from well-known manufacturers.
Bourns, Switchcraft, OakGrigsby, Mojo, Sprague, and CTS are some of the
best parts available (photos 1.5 and 1.6).
4. Hardware included with budget guitar kits are generally low-grade
cast-metal items with sloppy tolerances. Since a guitar’s bridge is a critical
component in the “tone chain,” you can seriously upgrade the tone of your kit
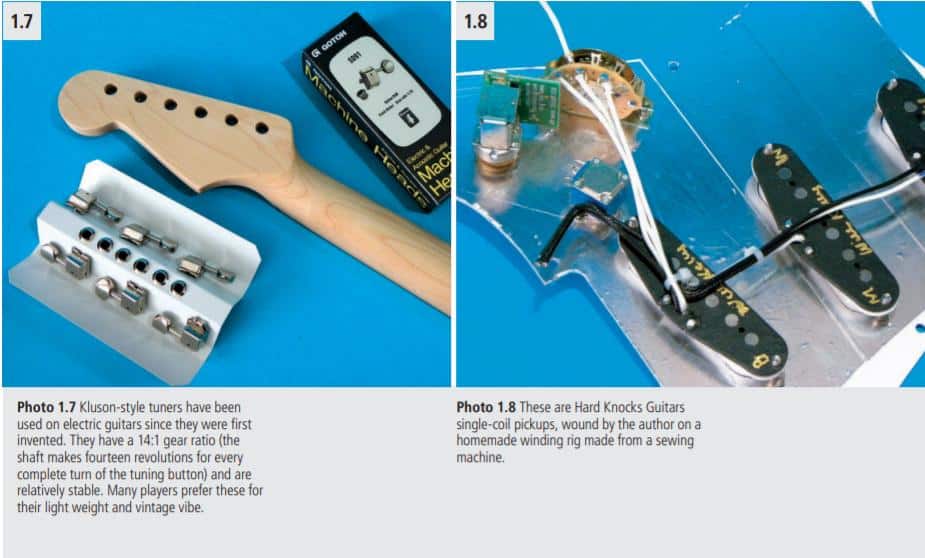
guitar by replacing the bridge and/or associated components. Tuners need to
be stable, accurate, and reliable, so it pays to purchase name-brand units that
will keep your creation in perfect tune (photo 1.7).
5. Pickups provided by kit makers are usually bought in bulk from overseas
at the lowest possible unit cost. This just doesn’t translate into a great tone,
so replacing the budget pickups with name-brand models can really make a
difference in your tone as well (photo 1.8).
BYOGuitar.com is a manufacturer and distributor of excellent guitar and bass
kits. Based in New Hampshire, they’re this author’s vendor of choice for kits and
parts, because in addition to selling quality guitar kits they also have a custom
shop that allows you to order a kit with the exact components you want. Rather
than buying a stock kit and discarding the parts you’re going to upgrade, you
can order the kit the way you want it to begin with. Choose upgraded pickup
models from a variety of manufacturers, as well as upgraded hardware, such
as tuners and bridges. You can even order your instrument’s body constructed
from one, two, or three pieces of your preferred tonewood. You’ll spend a little.
Photo 1.7 Kluson-style tuners have been
used on electric guitars since they were first
invented. They have a 14:1 gear ratio (the
shaft makes fourteen revolutions for every
complete turn of the tuning button) and are
relatively stable. Many players prefer these for
their lightweight and vintage vibe.
Photo 1.8 These are Hard Knocks Guitars
single-coil pickups, wound by the author on a
homemade winding rig made from a sewing
machine.
1.7 1.8
15 more than you would on a typical budget kit, but in the long run, you’ll have a professional-grade instrument that’s worth keeping and playing, rather than one that merely sits in a corner. In this author’s opinion, this is the best way to leverage your investment in a guitar build from both a time and a financial perspective. However, if you are unsure of the outcome and merely want to get your feet wet, there are less expensive options available to you. GuitarFetish.com is another online supplier of inexpensive parts and kits for guitars and basses. They offer many different styles of ready-to-assemble instrument kits. Their prices range from well under $100 to $200, relatively inexpensive in the grand scheme of things. While you’ll get inexpensive, multipart bodies made from lesser tonewoods, necks with marginal fretwork, and cheap hardware and pickups, the kits’ main components are well made and the kits are capable of becoming decent instruments when assembled correctly. SAGA also imports an inexpensive line of ready-to-assemble guitar kits that you can find at a lot of online sites. There are also several high-end guitar parts and kit manufacturers, such as Grizzly.com, Warmoth, and WD Music, to name just a few. The price of the kit is just one factor in making your decision. You should also do research online for feedback on manufacturers, especially when it comes to customer service and support, parts replacement and availability, and quality of construction. There are big differences between guitar kit manufacturers, just as there are big differences between automobile makers. The company that stands behind its kits is every bit as important as the guitar itself. Also, try to purchase U.S.-manufactured goods whenever possible!
TOOLS AND SUPPLIES
There are some basic tools and supplies you’ll need to build a guitar from
a kit. Most can be purchased at your local hardware or home improvement
megastore. Some can be ordered online from specialty suppliers, and some
you can even make yourself. Several of these tools are completely necessary to
completing your build; others are suggested as a way of making the job easier
or more professional. Certain supplies can be bought at the lowest cost, but
some—such as paint, sandpaper, and other finishing supplies—really demand
that you spend a little extra money to obtain a quality result. You get what you
pay for, and cheap tools and supplies lead to cheap craftsmanship. So pay a bit
extra to get the right tool and supplies. Once you’ve played your new guitar,
you won’t regret the additional investment in quality!
Required Tools
1. Screwdrivers, both Phillips and flathead. You need a range of sizes, from
0 to 4, 5, and even 6. Mostly you’ll be using the Phillips screwdrivers, but there
are a few flathead screws still in use on guitars, even today (photo 1.9)
.
2. Drill bits, for both wood and metal. These need to range in size
from very small ( 1⁄64 inch) to medium-size bits ( 5⁄8-inch or larger). The longer the drill bit is, the more useful it’ll be in your construction processes. You’ll also need an electric drill with a 3⁄8-inch chuck. Cordless is preferable (photo 1.10)
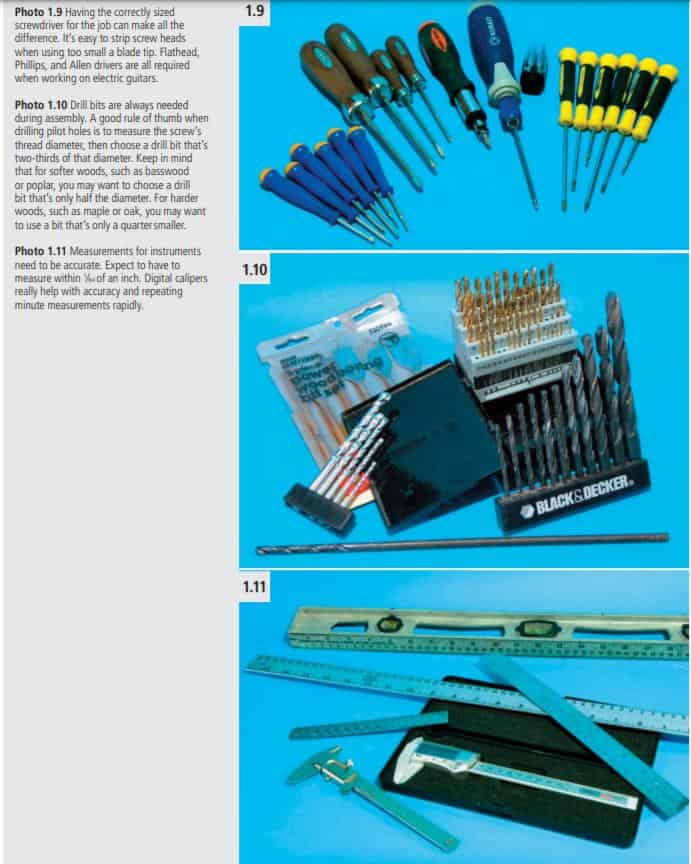

3. Measuring instruments. You’ll need to be able to accurately and
precisely measure distances of less than 1 ⁄32 inches, as well as to measure components nearly 3 feet in length. This entails having several different measuring devices (photo 1.11). You’ll need a small, finely delineated ruler capable of producing metric and English unit measurements of at least 1⁄64 inch. You’ll also need a straightedge ruler capable of accurately measuring at least 30 inches in length. It doesn’t hurt to have a digital caliper hanging around, in case you need to quickly convert metric to English or consistently and quickly reproduce a minute measurement, such as when you’re setting up the string heights on a new guitar. Digital calipers aren’t expensive, and they provide an extremely precise method of measurement that doesn’t require too much experience to use.
4. Soldering iron and rosin-core solder. You’ll want to use at least a 20-watt soldering iron because some components require more heat to properly solder than a resistor or capacitor does (photo 1.12). The solder should be rosin core, never acid core. A 60/40 or 80/20 (tin/lead) mix solder is usually the best application for electronic assembly. Also, have a small wet sponge on hand to clean off the soldering iron’s tip and ensure proper connections are made.
5. Files. You should purchase a set of small needle files as well as a set of regular-sized woodworking and metalworking files (photo 1.13). These can be found at most hardware and tool supply stores, and are usually needed to fine-tune the fit of components and to cut string slots in nuts and bridge saddles. Apply these conservatively and sparingly, as needed. The needle files should be sized as small as possible to be useful for cutting string guide slots in bridges and nuts, and for cleaning up small components’ fit and finish. The larger files can be used for carving neck profiles, fitting bridges and necks, and making minor adjustments that pop up during the course of the build.

6. Razor knife kit. In a collection of various sizes and configurations, razor knives can be used for a variety of exacting tasks (photo 1.14). I use them for everything from cleaning to adjusting the fit and finish of small wooden and plastic parts.
7. Small portable bench vise. This is extremely useful when you don’t have a permanent workbench or need a smaller, more accurate way to secure components while working on them. Try to locate a model that provides rubber clamping face covers so you won’t mar metal or delicate wood surfaces (photo 1.15).
8. Other hand tools. You’ll also need a set of small crescent wrenches with either metric or U.S. measurements (depending upon the kit’s components), various small hand tools such as diagonal cutters, needlenose pliers, a small hammer, a pair of small (3-inch) C-clamps, and an awl for marking screw locations quickly and accurately (photo 1.16).

Required Supplies

1. Sandpaper, flat-bottomed sanding block, steel wool, and single-edge razor blades. These items are used to finish wood and metal components’ fit so they go together tightly and accurately. You’ll also find these supplies necessary for professional paint finishing. Sandpaper comes in a multitude of grits and types, including wet/dry or nonclogging papers (photo 1.17). Go ahead and buy a few assortments, from 120-grit all the way up to 3,000- grit. Purchase fine-quality papers from reputable manufacturers such as 3M or Norton. Cheap sandpaper will not last as long and it can leave unwanted scratches and gritty residue all over your new paint job!
2. Guitar strings. Keep several sets on hand (photo 1.18). You’ll use one set to help accurately assemble the guitar’s components and set it up, and one set for “playing in” the assembled instrument.
3. Paint and finishing supplies. This comprises a variety of products, from tung oil to a specialty, vintage-tint nitrocellulose lacquer (photos 1.19–1.21). You might also need some additional finishing supplies, such as lacquer thinner, naptha, denatured alcohol, pore, and grain filler, wood glue, primer, and rubbing lubricant. What you need depends on the type of finish you choose to apply, but having the right chemical at the right time can make all the difference between a great paint job and one that’s not so great.
4. Buffing and polishing compounds. As with sandpaper and steel wool, these are available in different grits (photo 1.22). From medium grit to fine and superfine compounds, you can use these just like sandpaper, deploying successive grades of polish until you’ve gotten that smooth, glass-like surface you want on your guitar.
5. Guitar-related maintenance chemicals. These include string cleaners, nut
lube, thread lock, fingerboard oil, guitar finish cleaners, and waxes.

PROJECT WORKFLOW

Every guitar build will present you with its own unique set of options,
from the steps involved in successfully completing the finish of your choice
to any special steps necessitated by your choices of hardware and electrical
components. However, there is a consistent overarching workflow common
to all kit builds. By keeping this general outline in mind at the outset of each
build, you’re less likely to be thrown by the variables that come your way.
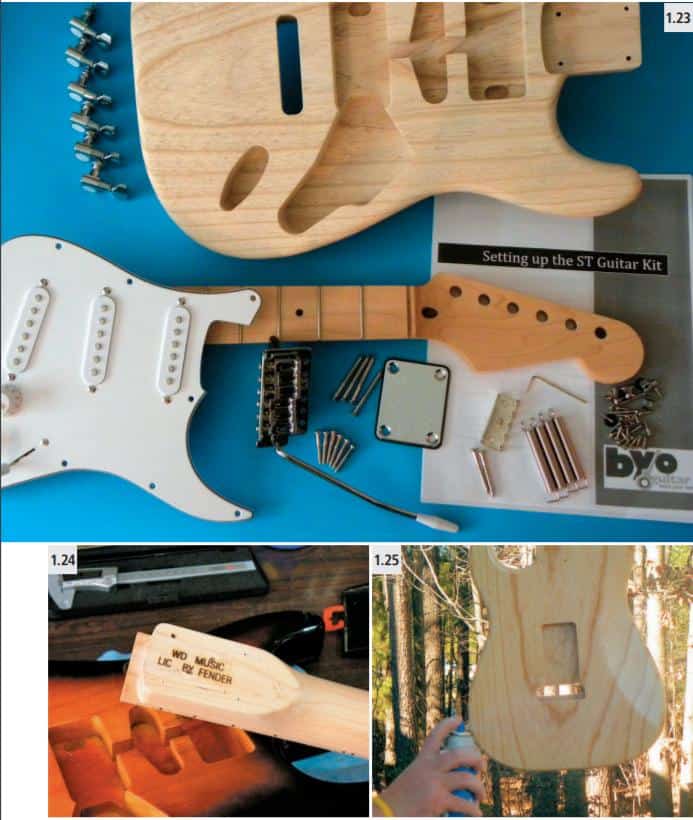
1. Unpack the kit’s contents, checking for correct parts and item quantities
(photo 1.23). Use the included parts master list to acquaint yourself with
the various components. Each type of screw is specifically supplied by the
manufacturer to attach a specific component, so make sure you know which
screws go with which parts. (This is one of the most common mistakes when
assembling a guitar kit for the first time.) And make sure you have all the
necessary components to finish your guitar—packing mistakes do happen!
2. Perform a preliminary test fitting of the major components (photo 1.24).
This includes fitting the neck into the body’s neck cavity and placing the bridge
into position. The major hardware components, such as the pickguard, pickups
(or possibly prewired pickguard assembly), and the tuners are also things you
should check for proper fit before moving forward with the rest of the project.
3. Finish the body and neck wood surfaces first and allow the paint to cure
and harden properly before you start assembling. Depending upon the type of
paint or finish you choose, this may take from one week to more than a month.
Be patient with this step—the longer you wait after painting, the better your
the project will look and perform (photo 1.25).

4. Install the major components of your instrument first. This includes the neck, tuners, and bridge. Make sure you can string up the instrument with just the bare essentials such as bridges and tuners, and then proceed to wire the electronic components.
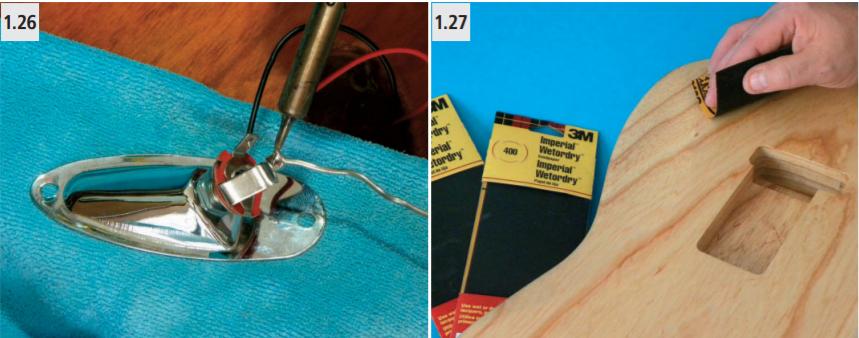
5. Complete the installation and final wiring of electronic parts, and the installation of the pickguard. This includes grounding wires from bridges, shielding wires, and grounding connections from strings and output jacks (photo 1.26). This is the next to last step, but don’t rush it!
6. Set up the string heights and adjust intonation, action, and pickup heights. Fine-tuning the neck angle, setting the bridge tremolo assembly, and lubricating the string paths are some of the last procedures you’ll perform before hitting that first power chord!

BODY PREPARATION
Body preparation is one of the most critical steps in obtaining a professional
paint finish on a guitar. Most kits include a body that’s been finish-sanded and
sealed, which means that the wood has been rough sanded and then sprayed
with one coat of clear sealer. The manufacturer does this to prevent moisture
from creeping into the raw wood surfaces during transport and storage, which
could split or swell the wood. You should smooth out any tooling marks left
by the CNC machines that were used to route the body, as well as any stray
cross-grain marks still on the unfinished wood when you remove this clear
sealer coat before finishing.
Starting with 120-grit sandpaper, smooth out the wood’s surface by rubbing
along the grain lines, not across them (photo 1.27). From now on, we’ll be
sanding and buffing along the length of the grain for the smoothest results.
Don’t dwell too long in any one spot, and don’t place too much-sanding
pressure on the factory-profiled edges, so you don’t round them over too much.
Also, later on, it’s pretty easy to sand through the finish on edges, and that’s not good for your project’s outcome. Progress to 220- and finally 400-grit sandpaper. By using successive grades of paper, you eventually end up with finer and finer surface scratches (photo 1.28).

After smoothing out the wood’s surface with 400-grit paper, take a rag or paper towel and rub down the wood’s surface with denatured alcohol (photo 1.29). This serves two purposes. One is to clean the fine wood particles and sanding grit particulate from the finishing surface. Second, the alcohol will slightly raise the grain of the wood before quickly evaporating rather than soaking it into the wood like water. When you do your final sanding passes with 400- and 600-grit papers (photo 1.30), the exterior surface of the grain that “furred up” with the alcohol will be cut off cleanly by the sanding process,
resulting in an incredibly smooth and even wood surface for final finishing.
Using some 0000-grade steel wool, do a final buffing of the exterior surface,
once again making sure to work along the grain lines. This step helps prepare
the surface for wood filling and primer applications (photo 1.31).


THE STRATOCASTER
The classic Stratocaster shape may be the most copied and emulated body shape in electric guitars. The sound of rock’n’roll would not be the same without it. Just take note of all the players who have found their own unique voice through Leo Fender’s most sought-after invention: Holly, Hendrix, Clapton, Beck, Gilmour, Knopfler, SRV . . . the list seems endless. But it’s not just the players. In today’s market, there is not a boutique electric guitar builder worth their salt who doesn’t have some version of a Strat-style guitar in their product line. The body style, sleek yet friendly, has a timeless quality that endures.

Jay Black, one of the founders of Fender’s famous Custom Shop. Notice the various Strat-style
bodies hanging in the background to dry. Jay’s a master finisher and hand built Eric Clapton’s very
first “Blackie” replicas. His shop produces handcrafted and finished bodies for some very famous
manufacturers and artists.
I don’t think that anybody’s style accepts as many colors or a variety of woods yet still maintains its original charms quite as well as the Strat. Ash or alder is the preferred body wood, but mahogany and basswood serve the tone just as well. The options for neck wood, body wood, pickup configurations, and bridges can leave you with a lifetime of possibilities.
You are not limited in what to use for the electronics either. An endless array of pickup combinations—a classic three-single-coil setup, two humbuckers, or even a Filter’Tron in the neck, a lipstick in the middle, and a P90 in the bridge—all have a home and result in useable tones with the Stratocaster format.
Design your guitar around the Strat shape, with or without a pickguard, downsize the shape, sharpen the horns, add a flame or quilted top, design it with or without contours, or chamber the body, and you have a unique, personal version of this classic. The Strat can be perceived as elegant art or a tool that always gets the job done. I cannot think of a more versatile platform with which to launch a new electric guitar project.
WOOD-FILLING AND SEALING
Guitar tone woods have porous, open-grained surfaces that usually require

prep work before applying a painted finish that will end up smooth and glossy.
Maple is a relatively tight-grained wood, which means that the pores are
small and the grain is tight and smooth on unfinished wood surfaces, and
doesn’t usually require wood-filling. Alder and basswood are medium-grain
woods that require some wood-filling, depending upon the grain and “figure”
(pattern) of the wood used. Mahogany and southern swamp ash have large,
open-grained pores that require extra effort in filling and smoothing before
obtaining a smooth and glossy professional-grade finish.
The body on our Stratocaster-style kit is made from a beautiful chunk
of southern swamp ash, the wood traditionally used by Leo Fender on his
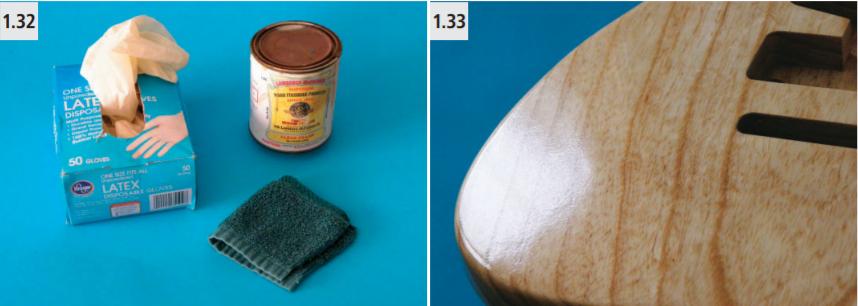
earliest guitars. This body blank was specially ordered from BYOGuitar.com and is made from only one piece of wood. Most replacement bodies and kit bodies are made from multiple pieces of wood to keep costs down for the manufacturer. It’s easier for them to source wood in smaller pieces than to try and find exceptionally large, useable wood stock just for the manufacture of guitar bodies. However, one-piece bodies are especially vibrant and toneful because there are no glue joints or mismatched pieces of wood to interfere with the natural vibratory aspect of the wood. You’ll pay a little extra for this feature, but if you have a discerning ear, it’s certainly worth it. Using clear pore- and grain-filler paste and a lint-free rag (photo 1.32), we’re going to put a thick coat on the raw wood body using a buffing motion. You need to use latex gloves to protect your skin from this chemical. Rub hard,
and rub across the grain lines to pack the filler paste into the wood’s open pores. The purpose of this step is to fill the wood pores to the level of the rest of the wood’s surface without leaving too much residue on the flat surfaces. Using a flat scraping tool with a clean, un-nicked edge, remove the excess filler paste from the surface and let dry for one day.

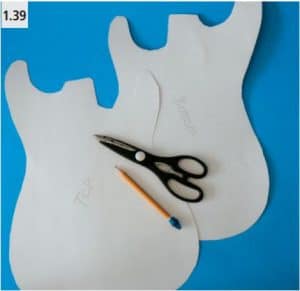
After waiting the appropriate amount of time, take your sanding block and some 220-grit sandpaper and even out the surface of the

body. If you still see small pores and grain lines exposed in the surface, you may want to reapply another coat of pore and grain filler and leveling it out after drying by scraping again carefully and repeating the process until you have a perfectly smooth surface with no visible pores or grain lines (photo 1.33). Once you’ve gotten the majority of the grain pores and lines leveled, it’s time to seal the wood with a light “wash coat” of clear lacquer. This provides a smooth foundation for the ensuing coats of paint to adhere to. Remember,
you always want to spray lacquer in a well-ventilated area and wear a mask and gloves. Spray a light coat and let it dry for a day before handling. Now is the time for a bit of light sanding and buffing to level the final surface in preparation for the paint coats to follow.
CREATING A SUNBURST FINISH
There are several steps to creating that iconic sunburst finish that so many
Fender guitars have been possessed for 60-plus years (photo 1.34). The good news is you don’t need fancy or complicated spray guns and compressors, sophisticated sanding and buffing machines, or positive-ventilation, microfiltered spray booths to accomplish this type of finish, just some good paint, some great prep work, some diligent smoothing and sanding, and a lot of patience.
Spraying the Amber Coat
First off, you’ll need to create a holder for the body so you can spray and handle the instrument without touching and messing up your newly applied paint. In the company’s early days, Fender workers simply used a 1×2-inch piece of wood stock screwed into the neck cavity pocket. The stick leaves a bare wood outline after painting, but this is covered up by the neck itself once
the guitar is assembled, so it’s a good place to mount a holder. I use a piece of 1×2-inch pine molding, approximately 16 inches long, attached to the neck cavity with two wood screws (photo 1.35). Place some thick metal washers between the cavity surface and the stick so there’s no place for lacquer or paint
to build up and bind to the stick holder (photo 1.36).

With the holding stick mounted to the body, place a

can of spray lacquer into a bowl of very hot tap water for
about 10 minutes (I use H. Behlen Starcast Amber). This
is a safe and efficient way of heating the can’s contents
to improve pressure and ensure a finer spray pattern
(photo 1.37). You can really see the difference with a prewarmed can.
Never place the spray can in a microwave or
conventional oven or heat the can with boiling water, as
this can cause the can to explode. You want to raise the
the temperature of the can’s contents slowly and safely, so that
it does its job well without danger to you.
Holding the can approximately 8 inches from the body
surface, and at about a 75-degree angle to the plane of
the body, make several light, overlapping passes with the
paint, gradually covering the surface with an even coat of
amber. Start with the flat surfaces of the top and back first,
then fill in the sides as you go. Use light, even coats. Once
you’ve coated the wood completely, hang it up and let it
dry for 24 hours before handling (photo 1.38). (Note that
temperatures below around 75 degrees Fahrenheit, as well
as high humidity, can result in longer drying times.)
After your evenly shaded amber coat has dried, use some
clear spray lacquer to seal this tint coat. This sealer coat
will prevent the ensuing coats of sunbursting lacquers from
bleeding into the amber coat, and will help you clean up
any mistakes in the ’bursting process, later on, should the
need to arise. After applying two thin sealer coats of clear
lacquer, let the body dry for set up, and harden for three
days without bothering it.
Spraying the Edges
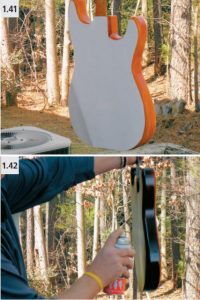
Place the body on some heavy-gauge poster board and trace both the top and the bottom of the body using a pencil. Once you’ve satisfactorily traced the body outlines, cut both out with scissors (photo 1.39).
These two outline templates will serve two capacities: one is
for covering up the top and back of the body while spraying the sides with a dark lacquer, and the second is to practice our sunburst painting skills.

Early Fender guitars didn’t use black, but rather dark brown lacquer for the outer sunburst color. Once Fender started using three-tone sunburst patterns in the mid-’60s with black on the outer edge, the overall look of the guitars changed aesthetically, in my opinion. So, we’ll use StewartMacDonald’s Tobacco Brown lacquer to spray the darker edges and keep this build style squarely in the ’50s. (photo 1.40).
Using double-sided masking tape, loosely affix the templates to their respective sides of the guitar body (photo 1.41). It’s okay if there are small gaps between the guitar body and the templates. You are simply trying to protect the majority of the guitar’s top from overspray that would otherwise cover-up that amber coat before you’re ready to ’burst it properly later on.
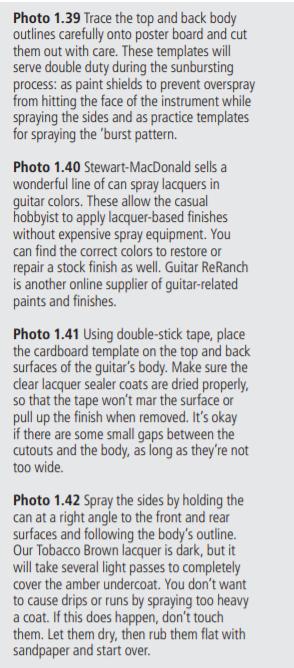
Working in a well-ventilated area, spray the sides of the guitar with the brown lacquer by holding the can at a right angle to the front and rear surfaces and following the body’s outline. Don’t spend too much time in any one spot, but rather evenly coat the sides with a light spray. You want to apply this darker lacquer coat in several light coats rather than trying to completely darken the sides in one pass (photos 1.42 and 1.43).

Spraying the ’Burst
Once the sides are sprayed, hang the guitar body back up and let dry undisturbed for two more days. During the drying time, you’ll practice your sunburst-spraying skills on the cardboard body templates we made. Pick a central point on the guitar’s body as a reference for the can’s starting position and spray outward toward the edges. Think of the paint spray as a cone shape exiting the nozzle. You only want the lower half of that cone to hit the extreme edge of the body, with most of the paint particles missing completely (photo 1.44). This technique is learned by practice, so pretend the clean back sides of the poster board templates are the real deal. Hold the can at approximately a 75-degree angle to the flat plane of the body while spraying outward toward the edges in the light, even strokes that follow the curves of the body’s outline (photo 1.45). You should end up with a dark, misted edge that is about 2 inches in width from the outside edge of the body. Trace new templates from the old and practice until you’re ready to ’burst the top of the guitar body using the technique you’ve perfected on the poster board templates (photo 1.46).

After letting your body with its sunbursted top dry and cure out for two days, repeat the ’bursting process with the dark brown spray lacquer on the backside, using the template you traced and cut out specifically for the back. Place the cardboard template loosely on top of the body and, centering the spray can spray light coats at about a 20-degree angle outward toward the edges, covering that same 2-inch border while shadowing the curved outline.

Once again, hang up the body and let the lacquer coats cure for another two days. After some drying time, spray two more light coats of clear lacquer to seal up the darker brown coats you’ve just applied. If you stop the ’bursting process now, you’ll end up with a two-tone sunburst, which was typical of the early Fender finishes from 1954 to 1959 (photos 1.47 and 1.48).
After that period, Fender began using a process that created a three-tone burst of yellow, orange, and black. To get the orange “middle” ’burst color, simply re-spray the H. Behlen Starcast Amber using the same edge bursting technique, but instead of spraying 2 inches in from the edge of the body, spray your middle burst another 11 ⁄2 inches in from the outer edge of the darker border. This will have the effect of darkening the amber inner coat to a dusky orange color.
Follow the inside edge of the darker outer coat, carefully following the curve of the darker ’bursted edge until you’ve gone completely around the body with the final amber coat. You will see a distinct shadow created in orange shading where you lightly sprayed this final amber lacquer edging. Once you’ve sprayed the front side and let it cure for approximately two days, repeat the process on the back and let it dry. Apply two more clearcoats of lacquer to seal the final color coats of lacquer.
Sanding and Buffing
Wait approximately two more days for the clear lacquer to dry before starting on the final, glossy clear lacquer coats. You can spray up to two coats of lacquer per day with a waiting period of approximately two days between successive coats. After spraying clear lacquer and allowing the coats to properly cure, you can then lightly wet-sand the clearcoats to remove any debris or paint overspray and level the surface for further coats. Put one drop of dishwashing soap in a small bowl of lukewarm tap water to act as your lubricant. Presoak the sandpaper in the water overnight so that the backing paper is pliable and easy to work with (photos 1.49 and 1.50).


Apply an even coat of soapy water to the paint’s surface with your fingers, then a light coat on the sandpaper’s surface as well.

Then, starting with 400-grit wet/dry paper mounted on a flat-bottomed sanding block and using light, circular movements, start working the paint surface evenly and lightly with the sandpaper (photo 1.51). You’ll want to keep the guitar’s surface relatively clean and free of particulate, so you may have to use paper towels to regularly wipe it off. You don’t want to take off too much paint because with each successive coat of lacquer you’ll build up the surface and fill in minor scratches and uneven spots. The purpose of the wet sand is to gradually level and smooth out the paint’s surface. I sand in between every two coats of clear lacquer, allowing at least two days of drying time in between initial coats before I start working it. I progressively work my way up through 600-, 800-, 1,000-, 1,500-, 2,000-, and then finally 3,000-grit wet/dry sandpaper.
You can apply as many coats of lacquer as you like, but remember that the more coats of lacquer you spray on, the less the wood will vibrate and resonate. There’s a happy medium in terms of gloss and great tone that you’ll have to discover for yourself. Personally, I prefer thinner finishes that show just a hint of grain. They just sound more musical to my ears (photos 1.52 and 1.53).
For optimum performance, let the body dry for at least three weeks. The finish will actually stay somewhat soft and pliable for up to a year, so be careful when working with the body for a long time afterward. You don’t want to damage all that hard work you’ve put into it.
You’ll want to do a fine sanding with 2,000-grit wet/dry sandpaper and a different lubricant. I use spray degreaser Goo Gone Spray Gel, which contains no silicone, waxes, or grease to impair the ensuing coats of lacquer from adhering (photo 1.54). It also provides a smooth, lubricated surface for the wet sandpaper to work with and does a great job on the clear lacquer topcoat
without allowing the paper to dig too deeply into the color coats.
After you’ve let the paint cure for at least a couple of weeks, you can start the final buffing. I use a couple of different grades of the liquid compound to accomplish this, much like using successive grades of sandpaper. You can buy these polishes at your local auto parts store, but remember to use rubbing compounds that don’t contain wax. We don’t want any wax on this finish just yet. I start with a medium-coarse compound, proceed to a fine-grade compound, and then finish up with a Plexiglas-polishing compound. This will remove fine scratches without leaving swirl marks on the paint. Use microfiber cloths as buffing pads (photo 1.55). These won’t leave lint residue and they won’t scratch the paint. Work in small areas, and keep turning the cloth to expose a fresh, clean surface to work with.
Apply a final polish using some Plexiglas scratch remover and a power buffer equipped with a lambs’ wool bonnet (photo 1.56). This will leave the guitar with a factory gloss that belies the fact you spray-painted the instrument yourself in your own backyard using “rattle cans”!

HARDWARE MOUNTING AND INSTALLATION
With our body finish completed and cured, it’s time to move on to the guitar’s hardware, namely the neck, tuners, bridge, and tremolo
claw. With the hardware carefully mounted and installed, our instrument will really begin to take shape. Done correctly, we’ll be on our way to an attractive instrument that’s a joy to play.
Installing the Neck

There should be no “wiggle” or looseness in your neck mounting. The alignment should be perfect because the manufacturer has already drilled the appropriate screw holes in both the body and neck. You may have to use some thin shims in between the neck and body cavity to adjust the neck angle, but you won’t know until you’ve had a chance to install a set of strings and check the adjustment range of the bridge and pickups for action and height (photo 1.57).
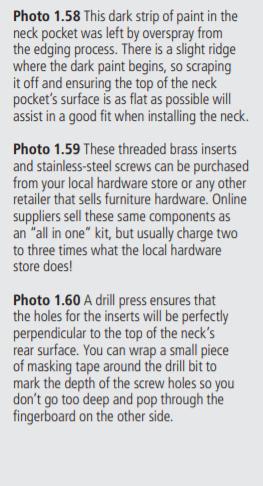
The first step to installing the neck is to remove any paint buildup or overspray in the neck cavity pocket (photo 1.58). Buildup can interfere with the neck, making full contact with the body. Use a flat-bladed scraper to carefully remove the paint, making sure you always work inwards toward the rear of the cavity. If you scrape outwards toward the edges, you risk chipping the paint at the edges and this won’t look so good unless you’re going to relic the instrument!

Over the lifetime of the guitar, the neck may be removed and reinstalled many times. The wood screws used to secure the neck can actually weaken and the holes can get stripped out. To avoid this, many professional guitar builders use threaded inserts in the neck with
machine screws so you can remove the neck as much as you’d like without damaging the guitar (photo 1.59). You can either order these screw and insert sets online, or go to your local hardware store and pay a lot less. Search the furniture hardware parts section for inserts made from solid brass with 10-24 threads and an exterior diameter of 7⁄32 inch and a length of 7⁄16 inch. You’ll need four of these, as well as
four 10-24×2-inch Phillips stainless-steel screws and two 10-24 stainless-steel hex nuts. You’ll also need one 7⁄16- and one 15⁄16-inch wood drill bit to correctly install the inserts.
Mark the depth of the inserts by wrapping a piece of tape around the 15⁄64 drill bit at 15⁄32 inches from the tip. This will prevent you from drilling too deep, or even worse drilling into the fingerboard! Start drilling each hole with the drill’s
motor in reverse rotation. This will cleanly start the hole without chipping or digging too deeply into the maple wood. The bit will progress slowly, and you don’t need to drill more than 1⁄16 inch deep before you can reverse the motor back to normal rotation. These holes must be perfectly perpendicular to the plane of the neck’s bottom surface, so use either a metal drilling guide or a drill press. Go slowly and be sure to use a sharp new bit, because maple can easily chip or splinter (photo 1.60).
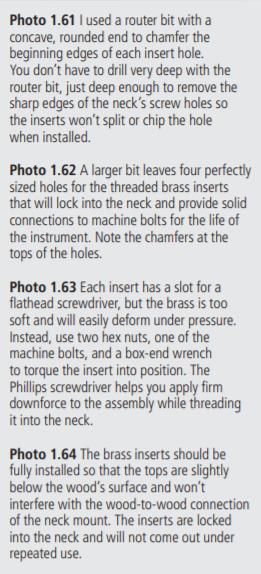
The brass inserts, when fully installed, displace wood as they bite into the neck. This can splinter or chip the edge of the hole and make flush mounting to
the body neck pocket difficult. The solution is to chamfer the top edge of each
screw hole. I use a router bit with a concave, rounded end that’s approximately
7⁄16 inch to drill into the smaller holes slightly, again starting with the drill motor in reverse (photo 1.61). Drill slowly, as you only have to go as deep as the head of the screw, approximately 1⁄16 inch. This procedure leaves a nicely beveled hole for the insert to thread into (photo 1.62).
Next thread the two 10-24 hex nuts about halfway on one of the 10-24×2-
inch screws. Tighten both nuts, one against one another. This secures them
against slippage so you can use these as leverage to turn the insert assembly
without damage. Thread on the brass insert, beveled end last. Now place
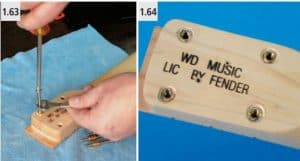
the screw/insert/nut assembly in the first hole and, using a 7⁄16-inch box-end wrench and a Phillips screwdriver, slowly twist in the insert (photo 1.63). Repeat with the three remaining brass inserts. The Phillips screwdriver helps you keep a steady, downward force on the insert assembly, while the box-end wrench allows torque and leverage while twisting. Without this leverage, the relatively soft brass inserts would be irreparably damaged when screwed into the hard maple.
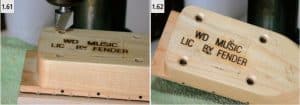
With the four inserts installed, the neck is now ready to mount to the body
(photo 1.64).
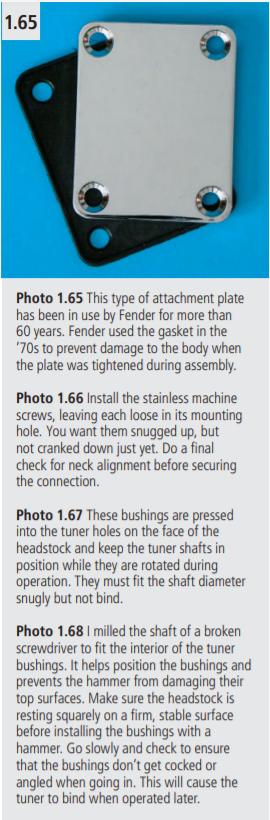
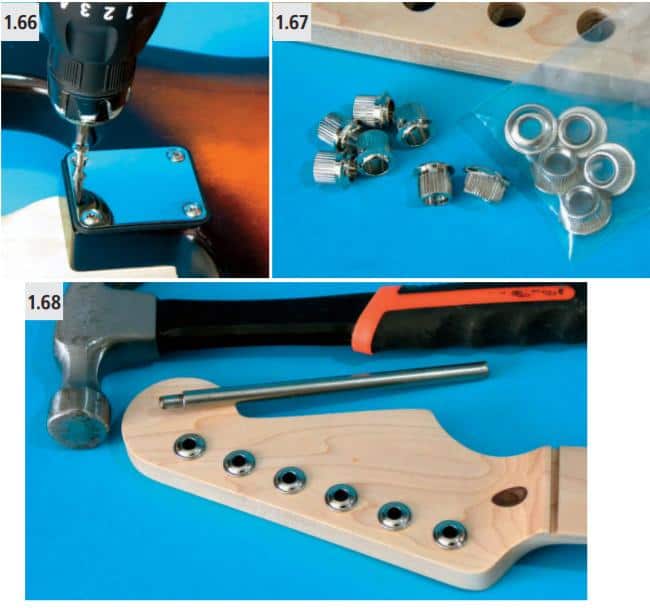
You’ll have to trim approximately 3⁄8 inch from the end of the 10-24×2-inch stainless-steel screws so that they don’t poke through the fingerboard. I used a Dremel rotary tool with an abrasive cutting wheel to do this quickly and cleanly. You can also use a hacksaw, or even shorten the screws on a bench grinder. Screw each of the four screws directly through the neck plate (photo 1.65), gasket, and body into our neck’s brass inserts. Don’t overtighten these screws, but do make sure they’re snug and there’s no lateral neck movement. A lower torque setting on your electric drill or screwdriver will help you avoid overtightening (photo 1.66).
Installing Tuners
Our Strat-style guitar will feature vintage Kluson-style tuners with a 14:1 ratio (photo 1.67). The front bushings are of the “pressed-in” variety. This means they fit snugly in the predrilled tuner holes on the headstock. Using a hammer and an old screwdriver shaft, lightly tap each bushing into position until it seats securely on the face of the headstock. Make sure these bushings go in perpendicular to the face because they can cause the tuner shaft to bind on the bushing if slightly skewed (photo 1.68).
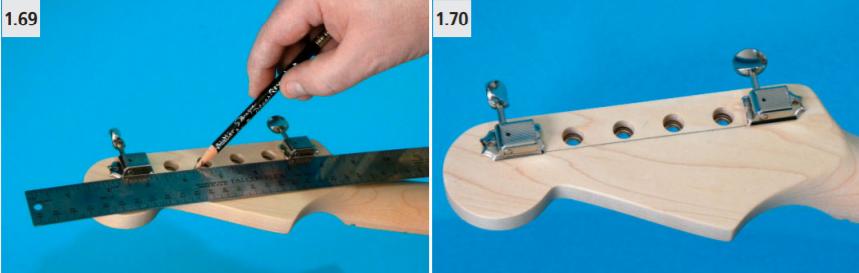
Flip the neck over, and put the two outer E string tuners in place. These end tuners differ from the inner four because they have an extended, scalloped metal flange on one end. Using a 6-inch straightedge, draw a light pencil line connecting the bottom edges of both tuners. We’ll use this mark to line up the remaining tuners for a straight, professional-looking installation (photos 1.69 and 1.70). Starting with the low-E tuner, mark both screw holes with an awl and, using a bit two-thirds the diameter of the screw threads, drill the two
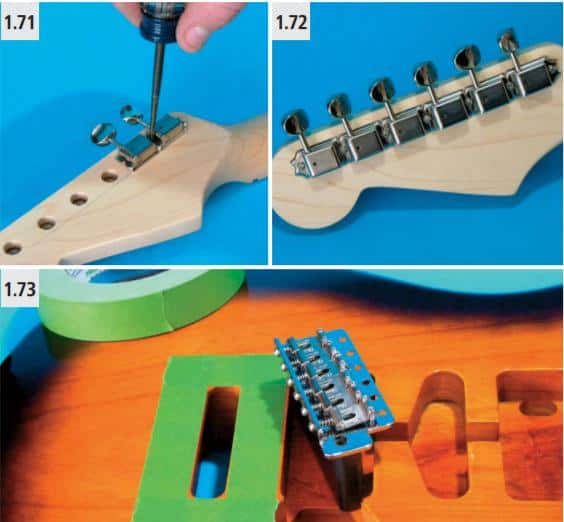
pilot holes to the correct depth. After the tuner is firmly secured, move to the next tuner location and repeat the process (photo 1.71). Progressively install each successive tuner until you’ve lined up all six units directly on the pencil line and screwed them down in a straight line (photo 1.72).
Installing the Bridge and Tremolo Claw
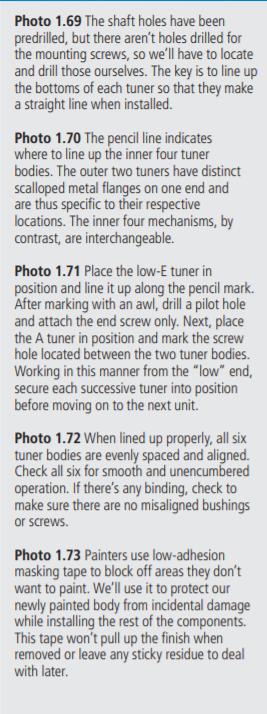
Next, using low-adhesion masking tape of the green or blue variety, mask off the freshly painted body surface surrounding the bridge cavity opening so you don’t mar the paint while working on the bridge (photo 1.73). Install the bridge in the bridge cavity. There are no pilot holes drilled for the six screws that secure the bridge to the top of the body, so you’ll have to mark and drill them yourself. But first, in order for the tremolo to operate properly, there needs to be a small gap between the side of the bridge unit that faces the pickups and the edge of the tremolo cavity. The easiest way to achieve this is to tape a small spacer shim 1 ⁄8 inch or so in thickness to the front face of the tremolo block before you put the bridge unit into the body cavity (photo 1.74).
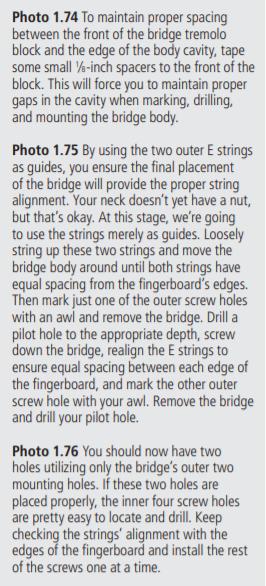
Install the low and high E strings through the bridge and secure them to their corresponding tuners. Your neck doesn’t yet have a nut, but that’s okay. At this stage, we’re going to use the strings merely as guides. Now line up these strings with the neck so that you have equal spacing between each string and the fingerboard’s outer edges. Once you’ve got it lined up properly, go ahead and mark just one of the outer screw holes with an awl, then remove the bridge (photo 1.75).
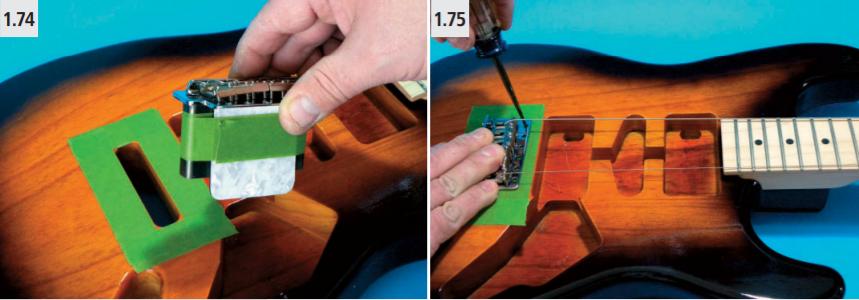
Using an appropriately sized bit—again, generally two-thirds the diameter of the screw threads—drill the one pilot hole you marked to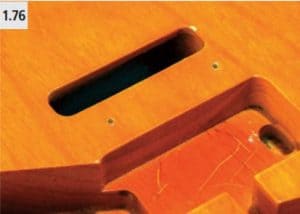 the correct depth. As with our neck-mounting pilot holes, use a drill stand or drill press to make sure you drill these holes completely perpendicular to the body’s plane. With the two E strings loosely attached, replace the bridge unit and install the screw through the appropriate hole on the bridge’s mounting surface. Line up the strings once more with the edges of the neck, and then mark the opposite outer screw hole position with the awl. Remove the bridge body once more and drill the second hole in the body (don’t drill the hole through the bridge’s mounting hole). You should now have two holes, utilizing only the bridge’s outer two mounting holes (photo 1.76).
Reinstall the bridge unit and screw in the second mounting screw, then check the alignment of the strings on the fingerboard. If everything looks good, mark and drill the inner four holes with the two outer screws in position. Again, it’s critical that these holes are all perfectly 90 degrees to the body so that the tremolo will operate without hang-ups or binding.
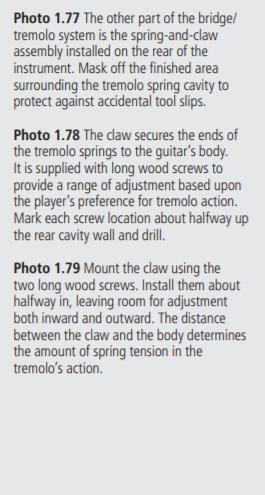
Again using low-adhesion masking tape, mask off the rear surface of the body surrounding the tremolo spring cavity (photo 1.77).
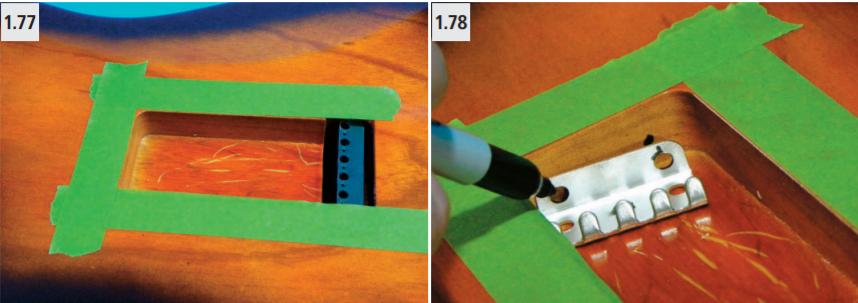
Mark two screw locations on the inner end wall of the cavity, about halfway up and halfway in from the sides (photo 1.78).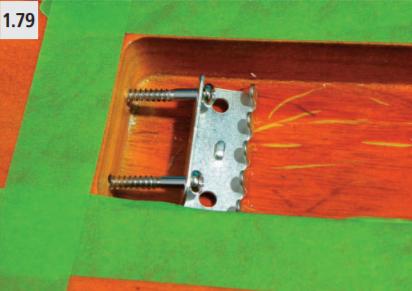
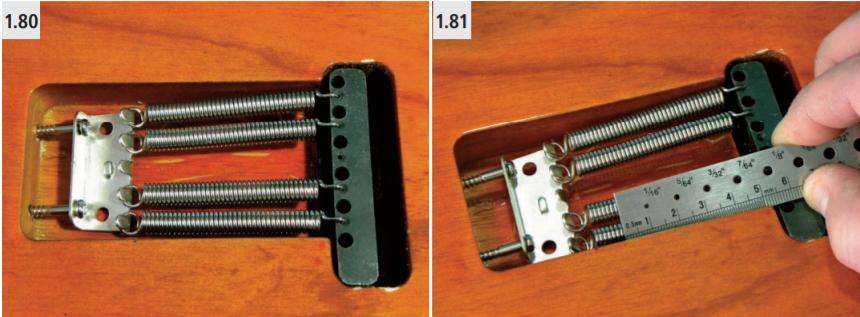
Hold the claw body up to the wood, about halfway from the top, and mark these screw locations so that they’re level with each other. Drill two pilot holes in the marked spots and install the claw with the two screws each screwed approximately halfway in (photo 1.79). Then attach the four springs to the claw and feed them into the appropriate mounting holes in the bottom of the tremolo body (photo 1.80).
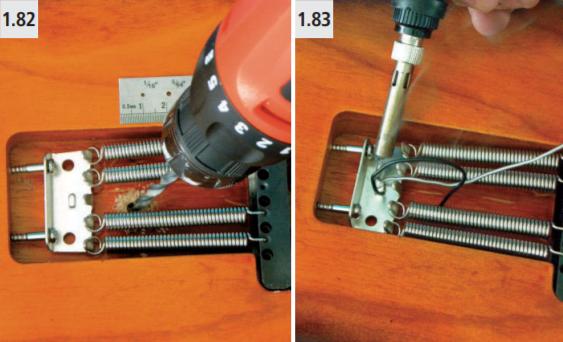
Strings need to be grounded to the electronics. A small wire connects the tremolo claw to the grounding in the pickguard assembly, but we’ll need to drill a hole through the body for the grounding wire to pass through. Once you’ve installed the bridge and tremolo claw and springs, take your 6-inch fine ruler and measure a point on the bottom of the pickup control cavity that is approximately 2 inches from the D string’s top exit hole on the bridge body (photo 1.81). Transfer this measurement to the rear control cavity, using the same D string hole for reference, and mark the spot with your awl. Using a 1 ⁄4- inch wood bit, drill a hole through the body between the tremolo spring cavity on the back and the pickup control cavity on the top (photo 1.82).
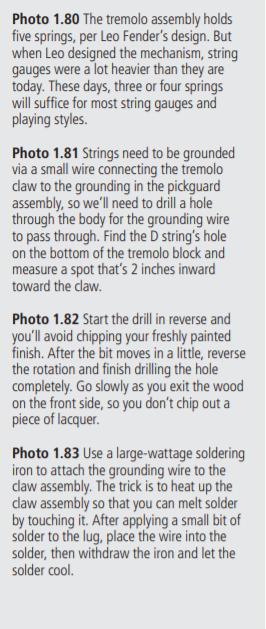
Strip about 1 ⁄4 inch of insulation from one end of the supplied piece of single conductor wire, which is about 8 inches in length. Using enough heat to get a firm connection, solder the stripped end to the bent metal lug strip on the middle of the spring claw, then run the rest of the wire through the hole you drilled between the two cavities for grounding to the electronic assembly later (photos 1.83 and 1.84).
ELECTRONICS ASSEMBLY
The preassembled pickguard in this kit features three single-coil pickups, three control potentiometers, and one five-way switch, all wired up and ready to rock (photo 1.85). The only connections that are not pre-soldered are the two wires to the output jack and the ground wire to the tremolo claw. Obviously, these can’t be pre-soldered, but rather must be done as the construction progresses.
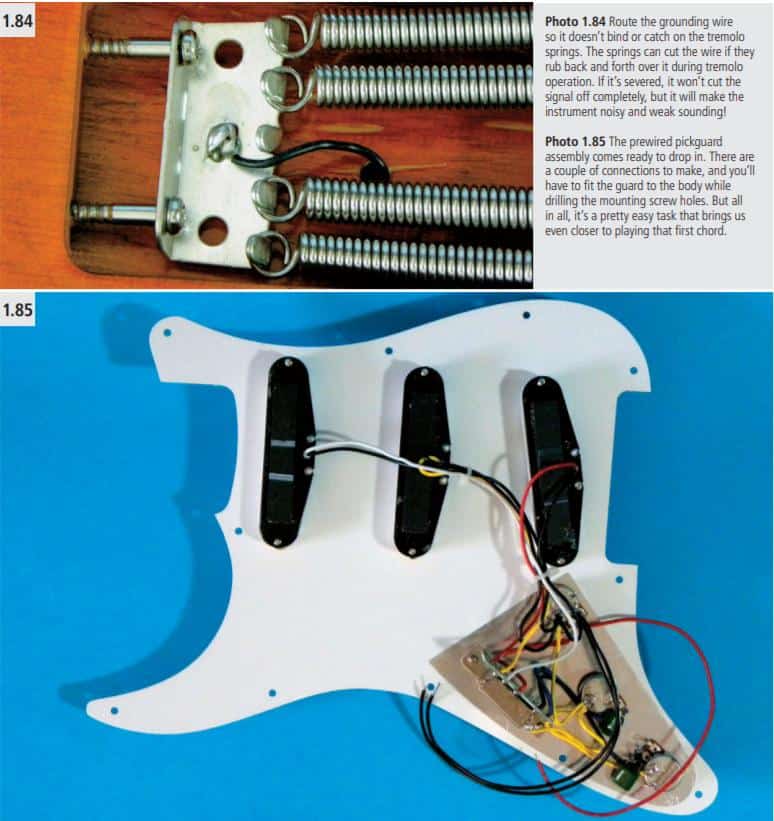
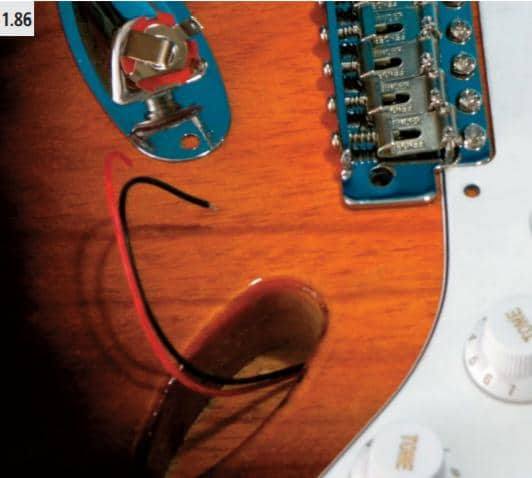
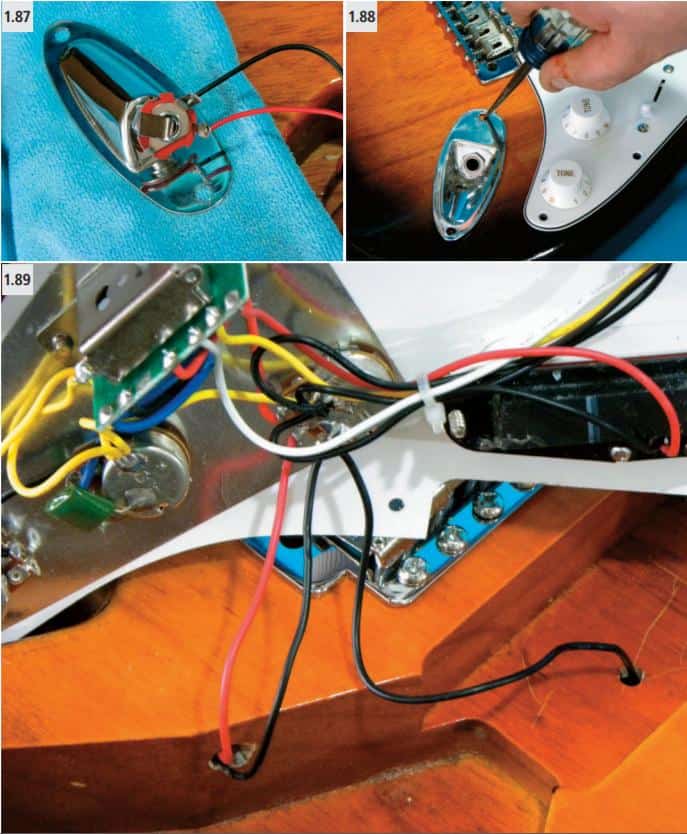
Two wires lead from the pickguard assembly to the output jack: a ground wire (black) and a “hot” or “lead” wire (red). Feed these two wires through the small predrilled hole between the pickup control cavity and the output jack cavity (photo 1.86), then solder the ground wire to the terminal or tab that makes contact with the barrel of the 1 ⁄4-inch output jack, and the hot or lead wire to the other terminal (photo 1.87). With the output jack and plate in position, mark the two screw holes with an awl and drill them to the proper depth with a 1 ⁄8-inch drill bit. Next secure the plate in position using two Phillips pickguard screws. Check the installation by inserting a standard guitar cord into the jack. It should insert without difficulty and the jack should catch the plug so there isn’t too much looseness (photo 1.88).
The wire that is grounded to the tremolo claw and enters the pickup cavity from the guitar’s backside is next soldered to one of the potentiometer’s metal casings to ground the strings electronically to the circuit. Make sure to leave enough slack so that you can safely remove the pickguard when needed without breaking the grounding wire (photo 1.89).
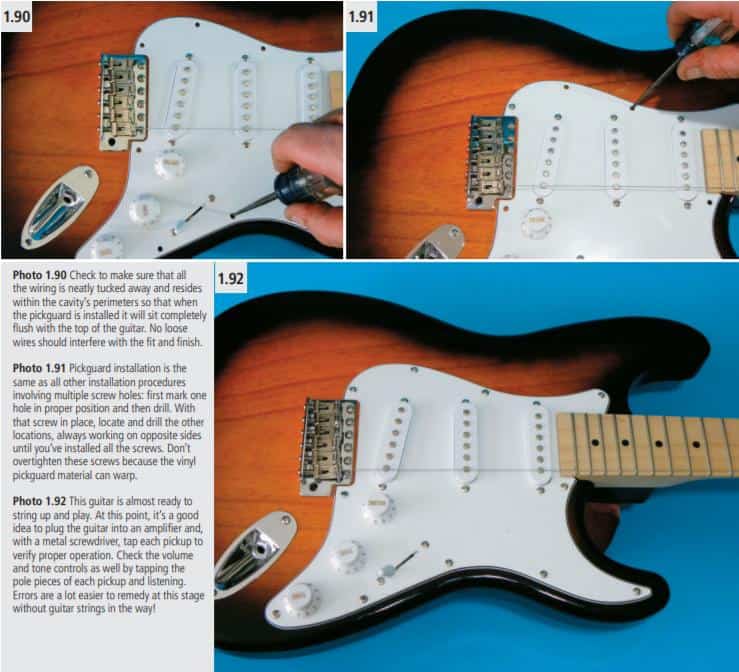
Once you’ve made these two connections, you can place the pickguard assembly on the guitar body, being careful to not scratch the paint when positioning the guard. Restring the high E string and line up the pickguard so that the string is positioned directly over the outer poles of all three pickups. When you’ve got them aligned correctly, take your awl and mark the screw hole closest to the bridge itself (photo 1.90), then remove the guard assembly and drill the hole with a 1 ⁄8-inch bit. Reinstall the pickguard assembly, lining up the screw hole you just drilled, and insert one pickguard screw. Recheck to make sure your strings are positioned directly over the pickups’ outer poles, then mark the four screw holes at the top of the pickguard assembly with your awl (photo 1.91). After removing the guard again, drill these four screw holes and reinstall the pickguard assembly along with the four screws for the newly drilled holes. If the strings are still lined up over the pickup poles, mark and drill the rest of the pickguard mounting holes and complete the assembly by installing the rest of the screws. Be sure not to overtighten these screws— undue pressure will cause the plastic pickguard to distort and pop up in places. You won’t even, uniformly level screws holding the pickguard assembly in place (photo 1.92).
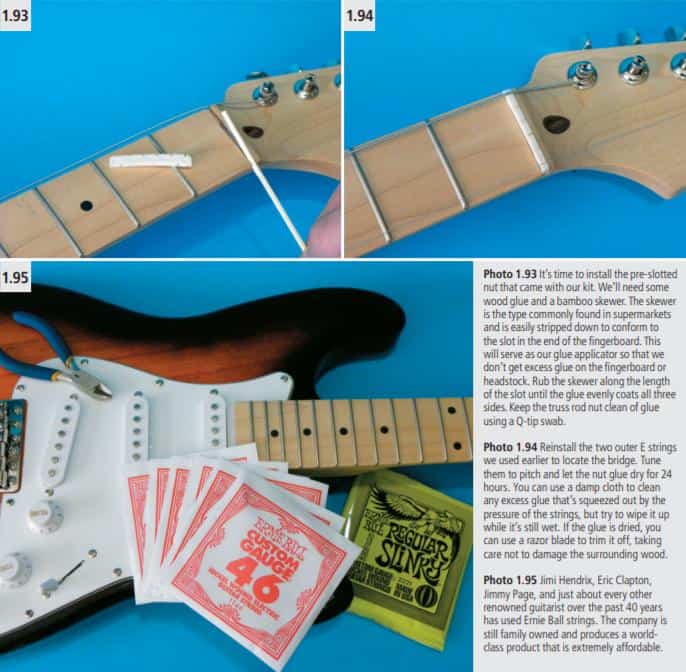
Last up is our nut. Using a wooden dowel sized to fit within the nut’s slot as an applicator, apply a small amount of wood glue to hold the nut (photo 1.93). Don’t use too much—excess glue can seep down to the truss rod assembly and glue it fast! String pressure will provide the downward force needed to set the glue properly (photo 1.94).
SETUP
With our hardware and electronics now in place, we’re ready to install a new set of strings and perform the finishing adjustments to the guitar (photo 1.95). Most guitar techs call this the setup, and it’s a finely honed art that takes years of practice to master. I’ll walk you through the basics, but don’t be surprised if this skill takes more than a few attempts to master.

Fingerboard Relief
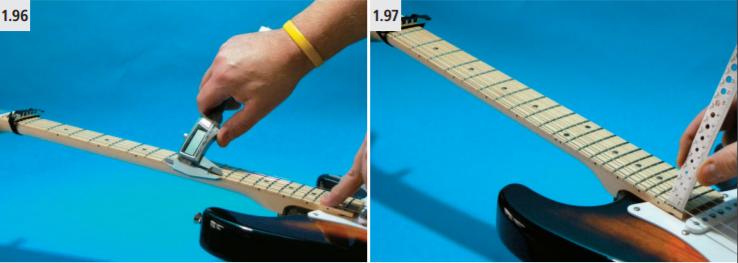
The first thing we do is inspect the fingerboard for straightness. Believe it or not, you really don’t want a perfectly flat neck surface. Instead, most players prefer what is called “relief.” This means the guitar’s neck is slightly bowed in a concave manner along its length, with a small gap between the bottom of the strings and the top of the twelfth fret. With all six strings installed, we’ll measure this gap. Lightly clamp a capo at the first fret position while pressing down the strings at the last fret position with your hand. Measure the distance from the top of the twelfth fret to the bottom of the low E string to ascertain the amount of relief. The goal is about .008 inches of relief, plus or minus a few thousandths of an inch (photo 1.96).
The Bridge Saddles
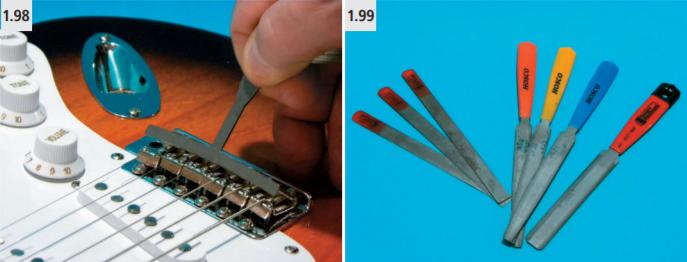
Leave the capo in position on the first fret. We’ll now set the bridge saddles to adjust the distance from the underside of each string to the top of the last fret on the neck. This distance should be approximately 0.1 inches (photo 1.97). If you adjust the two small Allen screws in each bridge saddle accordingly, you can adjust the individual height of each string so that all are equidistant to the last fret’s top surface. When each saddle is set correctly, the bridge will have a curve that exactly mimics the radius of the fingerboard, which is what we want. A check with a radius gauge will confirm the proper settings (photo 1.98).
Filing the Nut
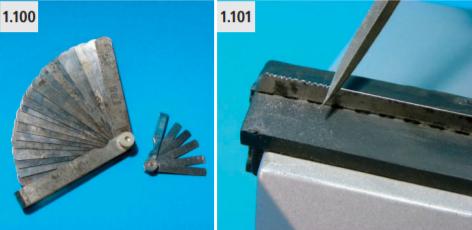
Remove the capo and recheck the tuning. You want the guitar’s string to be at the correct pitch so there’s the proper amount of tension in the string slot at the nut. For proper operation, each string slot needs to be cut to correspond to the string’s gauge. Most luthiers own a complete set of nut files (photo 1.99), each with varying thicknesses that can handle most string gauges from basses to mandolins. But these specialty tools are expensive, especially if you only use them once or twice, so we’re going to make some proper-sized nut files from less expensive tools.
You can find inexpensive, metal “gap gauges” at any auto parts store. They are usually sized in thickness from .050 to .001 inches (photo 1.100). These declinations are perfect for checking nut action and bridge heights quickly and repeatedly, so instead of setting the gap tolerances in engine-bearing mounts, we’re going to put them to a slightly different use!

Starting with the high E string (which is a .010 thickness in this case), we’re going to set the string height for the nut slot. The guitar comes with a pre-slotted, phenolic plastic nut, so we won’t have to concern ourselves with lateral string spacing. However, the distance from the bottom of the string to the top of the first fret is critical to the feel, action, and intonation of the instrument. Locate the gap gauge that is just slightly thicker than the particular string in question. For this example, to properly cut the slot for a .010 thickness guitar string, we’ll convert a .011 gap gauge to a nut file.
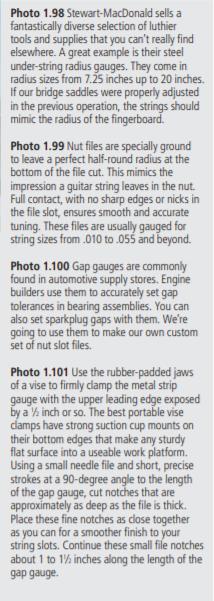
Use a small needle file with a fine edge to cut small cross notches in the leading edge of the gap gauge, converting it into a fine-toothed file capable of cutting properly sized nut slots. Place the gap gauge securely in your vise with the leading edge exposed. Using short, precise strokes at a 90-degree angle to the length of the gap gauge, cut notches that are approximately as deep as the file is thick. Place these fine notches as closely together as you can for a smoother finish to your string slots. Continue these small file notches about 1 to 11 ⁄2 inches along the length of the gap gauge (photo 1.101).
After you’ve filed your crosscut notches, use fine-grade sandpaper to remove any burrs or rough edges from both sides of the gauge (photo 1.102). You’ve now got a fine-toothed, correctly sized nut file to properly adjust the depth of the high E string’s slot!
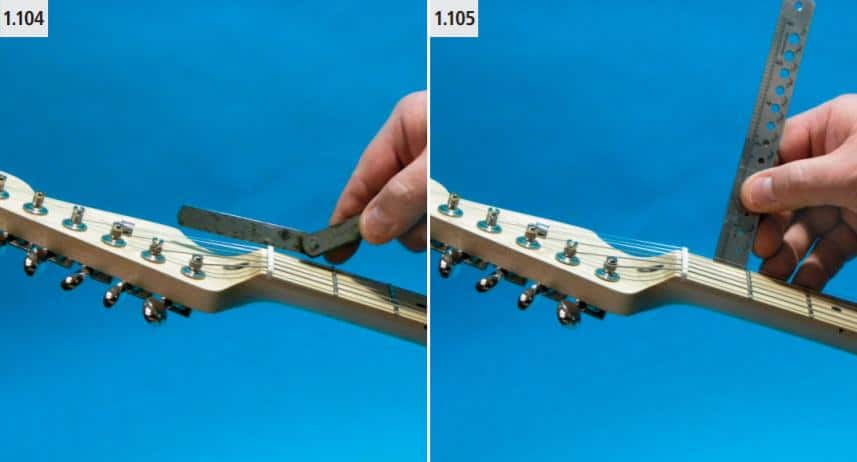
Detune the high E string and remove it from the nut slot. Using smooth, even strokes, file the nut slot slowly and carefully. You want to slope the bottom of the string slot downward slightly toward the tuner (photo 1.103) so that the highest point in the bottom portion is located on the edge of the nut closest to the fingerboard (photo 1.104). Go slowly here, and only make a few light strokes at a time before replacing the string, returning it, and checking the distance from the bottom of the string to the top of the fret. Fender’s factory specs mandate a 0.1 gap here (photo 1.105). You can adjust this distance so that it feels right to you, but the factory tolerance is a good place to start. You can always file it down a little more, but it’s impossible to add material once you’ve filed it down too much. Many luthiers have “blown out” a nut by cutting a slot too deep.
Once you’ve got the high E string’s height set properly, repeat this same procedure with each successive slot. Based on the particular gauge of the string, choose your appropriate gap gauge and modify the edge with your needle file before using it to deepen the string slots in the nut.
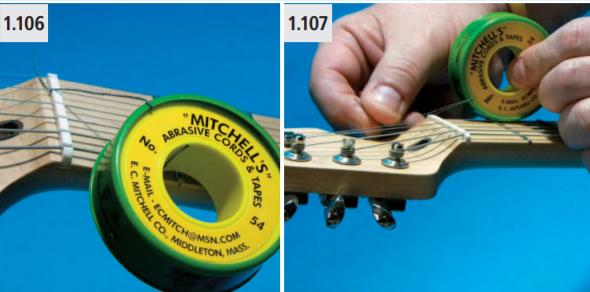
When you’ve gotten all six slots to measure equally in distance from the bottom of the string to the top of the first fret, then a good finishing touch is to use Mitchell’s Abrasive Cord to polish the nut slots (photos 1.106 and 107). This abrasive cord comes in different thicknesses, but purchasing three different gauged rolls (one thin, one medium, and one thick) usually covers most string sizes you’ll come across. Take a small piece of fresh cord and run it back and forth along the length of the string slot, until you don’t feel any more obstruction or “chatter” from the cord’s movement.
To help the string move unencumbered back and forth in the slot during performances, many players prefer to employ a lubricant here. Big Bends Nut Sauce is an excellent, all-purpose lubricant for getting smooth operation from your newly cut nut (photo 1.108). Use this sparingly and be sure to remove any excess lube that ends up on finished or raw wood surfaces.
SIMPLIFYING PICKUP HEIGHT
Another step in guitar setup is setting the height of your pickups. My friend and pickup guru Seymour W. Duncan has provided the following instructions for properly setting the height of a Stratocaster’s pickups. It certainly is good advice to pass along as you do a final check on your instrument. Take it away, Seymour.
Press down both E strings at the last fret, then adjust the height of the bridge pickup on the treble side to 1 ⁄16 inch from the bottom of the high E string. Next, adjust the height of the bridge pickup on the bass side to 1 ⁄8 inch from the bottom of the low E string. Finally, simply repeat the process, first with the middle pickup, then with the neck pickup. These balance and height adjustments work great for my personal guitars.

Seymour W. Duncan, the founder, and president of Seymour Duncan Pickups. Seymour virtually created the boutique pickup market and has built several iconic guitars for some very famous artists, including Jeff Beck’s “Tele-Gib” shown here. Courtesy Seymour Duncan
Intonation
To set the intonation, you’ll need a guitar tuner. Proper intonation is defined as the ability of an instrument to play in tune with itself. Each string has its own exact string length that varies with diameter, action height, and scale length. In theory, you want the harmonic note generated at the twelfth fret to be identical to the fretted note generated at the twelfth fret, which is generally the point halfway along the string’s length between the nut and bridge (photo 1.109). To make these two notes as close as possible to each other, the string length needs to be adjusted. To adjust the string length on a Stratocaster, all you need to do is take a Phillips screwdriver and turn the corresponding screw on the rear of the bridge to move the entire bridge saddle piece either closer or farther away from the nut.

Strike the harmonic note at the twelfth fret and tune the string so that this note is exactly accurate on your tuner. Then fret the same note and see how it measures up. If it’s sharp to the harmonic, move the bridge saddle away from the nut. If it’s flat to the harmonic, move the saddle forward toward the nut (photo 1.110). Check each string individually and adjust accordingly. Once you’ve gotten all six strings’ harmonic notes matching their respective fretted notes at the twelfth position, the guitar’s intonation is considered correct.


Play the guitar, paying particular attention to how in tune the open notes sound compared to fretted notes, especially within certain chords. Open E, D, and G chords are particularly telling when an instrument’s intonation isn’t set properly. If your guitar sounds in tune with itself when playing these chords, you’ve done the procedure correctly.


